7.2 KiB
Setting up your development environment
If you'd like to customize your keyboard's layout or functionality, the most robust and flexible option is to use the Arduino IDE.
Arduino is one of the world's most widely used (and user friendly) platforms for programming "embedded" devices like the chip inside your keyboard.
Set up the Arduino IDE
Arduino's designers made it to be accessible to people at all skill levels, and Kaleidoscope is built on top of the Arduino platform because we share that goal. The easiest way to customize your keyboard's firmware is to use the Arduino IDE. Even if you expect to use the command line to compile your firmware, you'll still need to install Arduino, as they provide the compilers and libraries Kaleidoscope needs to work.
Using the IDE is is the easiest process for folks who are new to Arduino, or to programming generally. If you follow the instructions below step by step you should be fine. :-)
The right way to install Arduino is a little bit different depending on what operating system you use.
- Install Arduino on macOS
- Install Arduino on Linux
- Install Arduino on Windows 10
- Install Arduino on FreeBSD
Install Arduino on macOS
- Download the Arduino IDE install package from https://www.arduino.cc/en/Main/Software
As of this writing, the latest version is v1.8.13, which you can download from https://www.arduino.cc/download_handler.php?f=/arduino-1.8.13-macosx.zip
-
Double-click "arduino-1.8.13-macos.zip" to uncompress the Arduino IDE.
-
Move Arduino.app from your
Downloadsfolder to your Applications folder. -
Double-click on Arduino.app to start it.
Next step: Add keyboard support to Arduino
Install Arduino on Linux
-
Install version 1.8.13 or newer of the Arduino IDE from http://arduino.cc/download. Unfortunately, the version packaged in Ubuntu is too ancient to support Arduino's new way of doing 3rd-party hardware.
-
Assuming you're untarring in the download directory:
$ cd ~/Downloads $ tar xvf arduino-1.8.13-linux64.tar.xz $ sudo mv arduino-1.8.13 /usr/local/arduino $ cd /usr/local/arduino $ sudo ./install.sh -
On some linux distributions, ModemManager can prevent you from flashing or updating your keyboard by interfering with its virtual serial port. Additionally, by default, you may not have permissions to access your keyboard's serial port.
udevis the Linux subsystem that managed both of these things. You should install our udev rules to manage access to your keyboard's serial port.$ https://raw.githubusercontent.com/keyboardio/Kaleidoscope/master/etc/60-kaleidoscope.rules $ sudo cp 60-kaleidoscope.rules /etc/udev/rules.d $ sudo /etc/init.d/udev reload -
Then disconnect and reconnect the keyboard for that change to take effect.
-
To let Arduino talk to the device over the serial port, you'll need to be in the appropriate group. On Ubuntu and some other Linux distributions, the group you need is the 'dialout' group.
From a shell:
$ groupsIf you see dialout in the list, you're good to go. If you don't, you'll have to add yourself and then get Linux to recognize the change in your current shell:
$ sudo usermod -a -G dialout $USER
$ newgrp dialout   # or su - $USER, or log out and in again
On Arch linux, Manjaro linux, and probably other Arch derivatives, the group for the device access is
uucp. To add yourself to this group if necessary, use$ sudo usermod -a -G uucp $USER $ newgrp uucp # or su - $USER, or log out and in again -
You may have to tweak the
ARDUINO_PATH(put this line in your shell-rc)export ARDUINO_PATH=/usr/local/arduino
Next step: Add keyboard support to Arduino
Install Arduino on Windows 10
Note: This tutorial has been written using Windows 10.
- Download the Arduino IDE installation package from https://www.arduino.cc/en/Main/Software
As of this writing, the latest version is v1.8.13, which you can download from this URL:
https://www.arduino.cc/download_handler.php?f=/arduino-1.8.13-windows.exe
Note: Some users have had difficulties with the Windows store version of the Arduino IDE. Please use the downloadable installation package.
- Open the installation package and follow the prompts to install the Arduino IDE.
Next step: Add keyboard support to Arduino
Install Arduino on FreeBSD
-
Install the following packages required by the build system:
bash,gmake,perl5,avrdude, andarduino18.$ sudo pkg install bash gmake perl5 avrdude arduino18
Flashing firmware as non-root.
-
If you want to flash your firmware as non-root, ensure your user has write access to the appropriate USB devices in devfs. By default, the devices are owned by
root:operator, so put yourself in theoperatorgroup. You will also need to add yourself to thedialergroup to use the modem device:$ sudo pw groupmod operator -m $USER $ sudo pw groupmod dialer -m $USER -
Add devfs rules for write access for operator to USB devices:
$ cat << EOM >> /etc/devfs.rules # # Allow operators access to usb devices. # [operator_usb=5] add path usbctl mode 0660 group operator add path 'usb/*' mode 0660 group operator add path 'ugen*' mode 0660 group operator EOM -
Update
/etc/rc.confto use the new devfs rule as the system rule:$ sudo sysrc devfs_system_ruleset=operator_usb -
Restart devfs:
$ sudo service devfs restart
Next step: Add keyboard support to Arduino
Add keyboard support to Arduino
-
Open the Arduino IDE. It will open an empty "sketch" window.
-
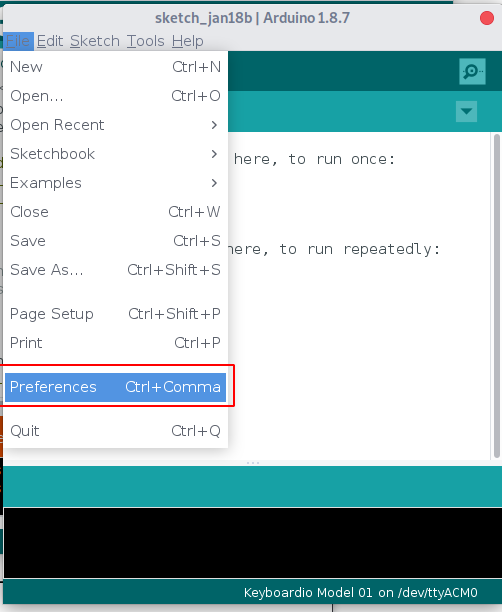
On Windows or Linux: Open the "File" menu, and click on "Preferences." On a Mac: Open the "Arduino" menu, and click on "Preferences."
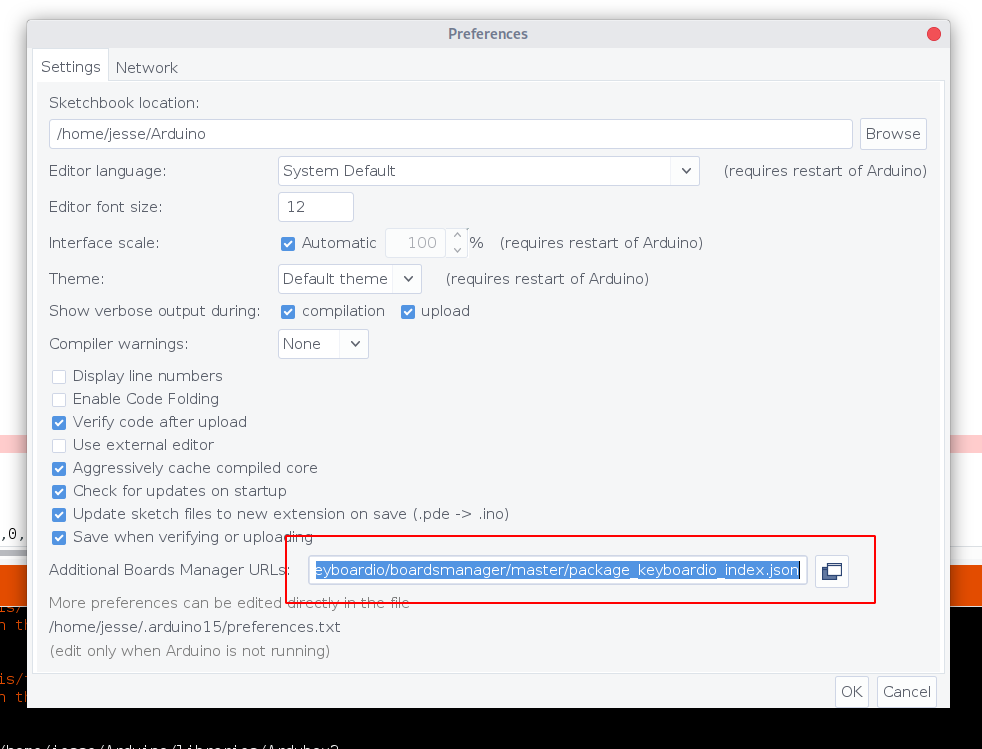
- Paste the following url into the box labeled 'Additional Board Manager URLs':
https://raw.githubusercontent.com/keyboardio/boardsmanager/master/package_keyboardio_index.json
-
Click ‘OK’ to close the dialog
-
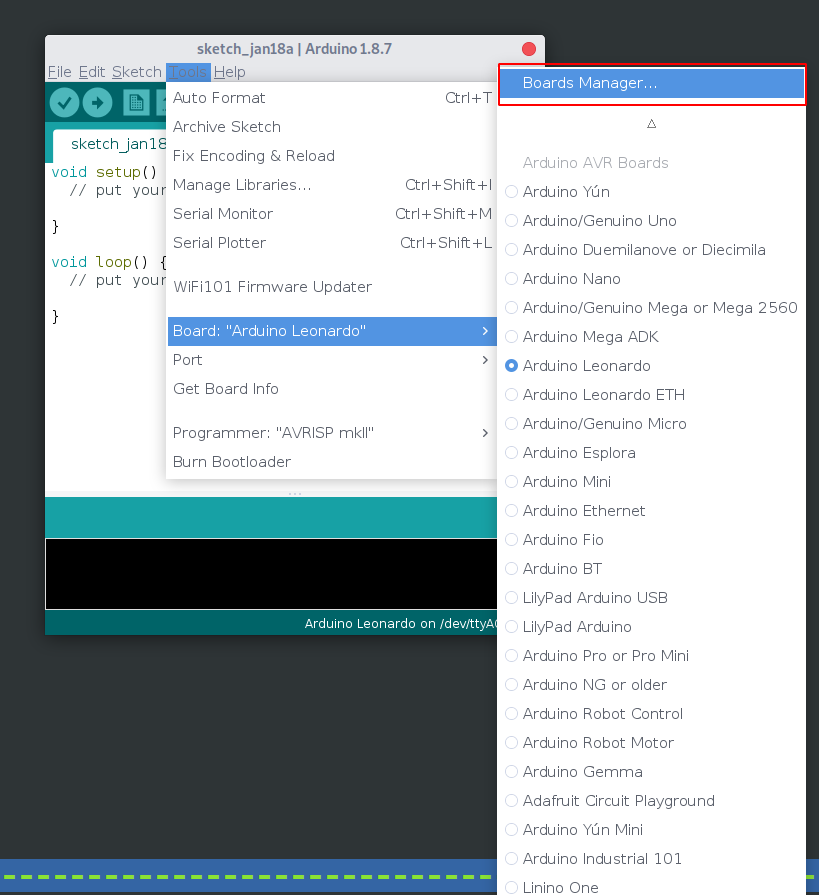
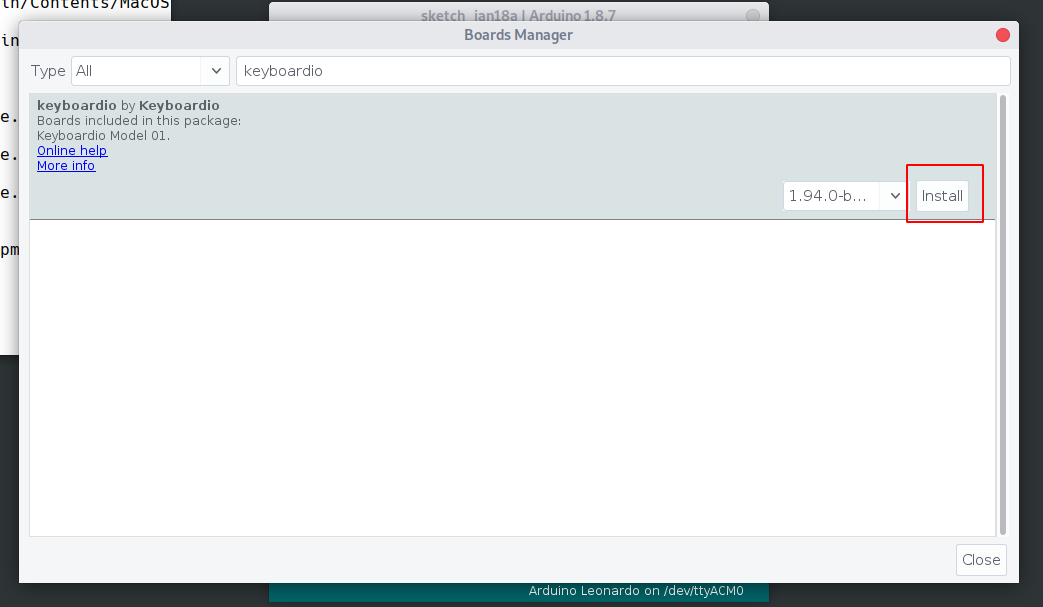
Open the ‘Tools’ menu, click on ‘Board’ and then click on ‘Boards Manager’
- Type ‘Keyboardio’ into the search box.
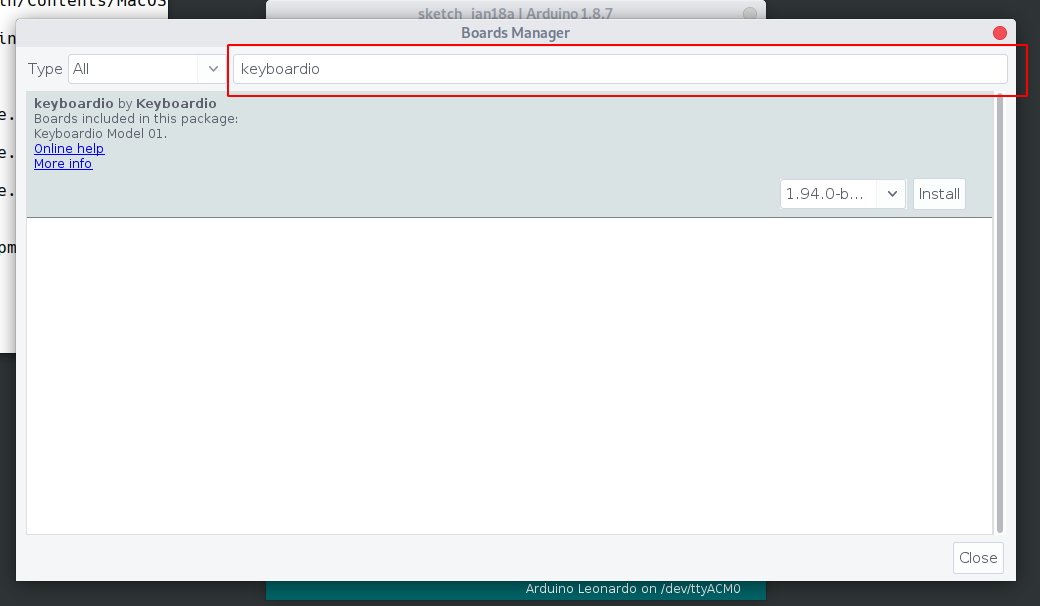
- You will see an entry that says "keyboardio by Keyboardio" click on it to select it, and then click ‘Install’.
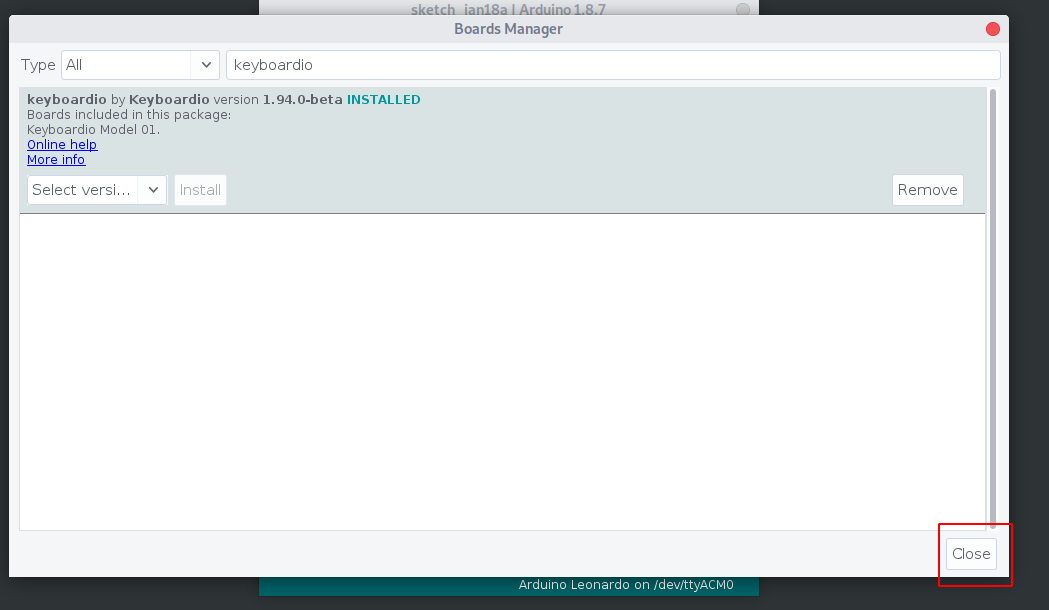
- Once the install completes, click "Close".
Next up, you might want to build the latest version of your keyboard's firmware